Been busy: catching up with some tasty treats!
August was a crazy month in the Eisner-Lafferty household. As those of you who read Rich’s blog are aware, he just started his MBA at U Ottawa. The last two weeks for him have been quite literally an intensive courseload: two classes completed in two weeks. Ouch. Needless to say, he has far less spare time right now. And that results in me having less spare time, as I have to do a bit extra around the house to keep things running, so-to-speak.
There’s something else that’s happened as a result of Rich heading to grad school — less time and money for foodie adventures. We used to be the types to plan meals pretty randomly, based on whim and cravings. We’d go out to eat at least once a week and go grocery shopping several times a week, things we could easily afford to do. Now that we’re a one income household temporarily, it’s made us really scale back on food related spending. We’re both fine with this, but it means we have less upscale, interesting restaurants to blog, and more cheap, interesting restaurants and cooking adventures to blog.
Today I decided I’d make a few things to get us through the next week. One thing I’ve found with Rich’s new schedule is that it is really nice to have some pre-made things for those nights where I don’t get home until after 8pm and Rich has group work or other stuff that keeps him out just as late (or later).
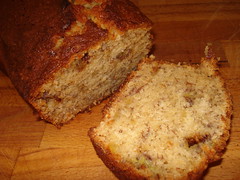
The first is an old favourite I’ve been making for years: Banana Bread. I’m sure everyone out there has their own recipe that they love, but this one is mine. Except, I decided to modify it a bit today to increase the nutritional value; I added some of the left over oat bran from the Food Network Cooking Club recipe for August.
Banana Bread (with Oat Bran)
Yield: one loaf
1½ cups white sugar
½ cup butter, softened
3 really ripe bananas, mashed
2 eggs
1 ½ cups all-purpose flour
½ cup oat bran
1 tsp baking soda
â…“ cup sour milk or buttermilk
¼ tsp. salt
1 tsp vanilla extract
Directions
Preheat oven to 350°F (175°C). Lightly grease an 8″ x 4″ loaf pan.
Combine all ingredients into a large mixing bowl. Beat well. Pour batter into pan. Bake on middle shelf of oven for 60 minutes, or until a toothpick inserted into the center of the loaf comes out clean.
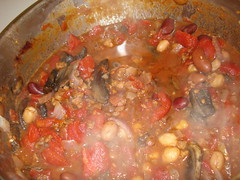
Naturally, of course, we can’t live on banana bread alone this week, so I decided to take some advice from Leslie over at Definitely Not Martha and try the whole Eat Free Campaign thing. This involves taking some items you already have on hand, without going to the grocery store, and turning them into a tasty meal. Given the fact that we’re trying to cut back on spending, I really liked this challenge, and decided to make a nice big pot of vegetarian chili. Now, when I made chili, I just sort of toss in whatever sounds good and flavour the whole thing with chili powder, cumin, coriander and sometimes some hot sauce/hot peppers/etc. Today I decided some chipotle sauce would do the trick.
Vegetarian Chili
Yield: 4-6 servings, depending on how hungry people are!
Half a large red onion, diced
Two cloves of garlic, minced
1 Tbsp olive oil
half a package of pre-sliced white mushrooms
half a package of veggie ground round (yves brand is what I used)
1 28 oz can diced tomatoes
1 19 oz can beans, drained and rinsed (kidney are a good choice; I used ‘mixed’, which were kidney, romano, chickpeas and black eyed peas)
4 Tbsp chili powder
1 Tbsp cumin
1 tsp ground coriander
1 tsp chipotle hot sauce
* For all spices, it’s really a matter of taste. Add more if you like or less if you prefer!
 Directions
Saute onion and garlic in oil over medium heat, just until the onion is soft, about 3 or 4 minutes. Add in mushrooms and saute until tender, about 3 more minutes. Add in veggie ground round and cook until heated through, then add in tomatoes and spices. Simmer for 15 minutes over medium-low heat, then stir in beans and simmer for an additional 10 minutes.
Serve hot as is, or you can garnish with sour cream and/or cheddar cheese. I like to have mine with some cornmeal muffins. I didn’t take pictures of these, but this is the recipe I used, which I’ll copy here:
Cornmeal muffins
Yield: 6 Servings
1 cup Flour
1 cup Cornmeal
2 tablespoon Sugar
4 teaspoon Baking powder
1 teaspoon Salt
1 Egg
1 cup Milk
2 tablespoon Melted butter or margarine
Directions
Sift together flour, cornmeal, sugar, baking powder and salt. Add beaten egg and milk, mix well, then stir in melted butter or margarine. Put into greased muffin pans and bake in 400°F oven for 20 to 25 minutes.
All of that should keep us happy for at least a few days! And hopefully this is the beginning of some interesting ‘cheap eats’ cooking over the next year.